Showing posts with label McAfee ePO. Show all posts

Tuesday, October 22, 2013

Solved: McAfee epo services not starting, error 7024 ID in event viewer

Issue:
 McAfee epo 4.6.3 services were not starting, 7024 ID was seen in logs

Reading the error 7024 description it says that apache server is unable to listen to socket, means port 80 i used by someone. So i quickly disabled my IIS service and SQL Reporting Service , tried to restart McAfee ePO services and all came up seemlessly.


Solution:
1. DISABLE WORLD WIDE WEB PUBLISHING SERVICE (IIS service)
2. DISABLE SQL REPORTING SERVICE (As it uses IIS at some points)

Tuesday, October 8, 2013

SOLVED: McAfee ePO requires 8.3 naming to be enabled


McAfee ePO requires 8.3 naming to be enabled

 Click Start, Run, type regedit and click OK.
    Navigate to:
         
            [HKEY_LOCAL_MACHINE\SYSTEM\CurrentControlSet\Control\FileSystem]
    Change the NtfsDisable8dot3NameCreation value to 0.
    Restart the server.

 and you are done :)

Monday, October 7, 2013

ePO server backup and disaster recovery procedure

ePO server backup and disaster recovery procedure
The following detail has been taken from McAfee knowledge base as a handy link for backup and recovery

Reference: https://kc.mcafee.com/corporate/index?page=content&id=KB66616

Environment

McAfee ePolicy Orchestrator (ePO) 5.x, 4.x

For details of all supported operating systems, see KB51109.

Solution

IMPORTANT:
  • This procedure is intended for use by network and ePO administrators only. McAfee does not assume responsibility for any damage incurred because they are intended as guidelines for disaster recovery. All liability for use of the following information remains with the user.
  • The procedure is for use with ePO 4.5, 4.6, and 5.x servers only. For ePO 5.x users, it is preferable to use the built-in Disaster Recovery feature and only use these steps if a valid Snapshot was not created and a manual recovery is required.
  • The Operating System (OS) must be the same if you are going to re-install the OS.
  • You must reinstall ePO to the exact same directory path as the previous installation or initialization of extensions will fail when the restore is complete. See KB70685 for a Product Management statement regarding this limitation.

NOTES:
  • The Agent uses either the last known IP address, DNS name, or NetBIOS name of the ePO server. If you change any one of these, ensure that the Agents have a way to locate the server. The easiest way to do this would be to retain the existing DNS record and change it to point to the new IP address of the ePO server. After the Agent is able to successfully connect to the ePO server, it downloads an updated SiteList.xml with the current information.
  • The procedure can also be used by customers who want to migrate the ePO server to another system. For ePO 5.x users, it is preferable to use the built-in Disaster Recovery feature to migrate the ePO server to another system.

Preparation
To ensure a smooth recovery, do not perform a backup while the server is in the middle of installing an extension.

Before backing up
If possible, shut down the McAfee ePolicy Orchestrator Application Server service (Tomcat) entirely when doing the backup. Otherwise, ensure that no one is performing the following actions during the backup:
  • Installing, uninstalling, or upgrading an extension
  • Updating the ePO database configuration 

Backing up1. Use the following to back up the SQL database (normally named ePO4_, where the is your ePO 4.5 / 4.6 server name):
  • See article KB59562 - How to back up the ePO database using OSQL commands, or KB52126 - How to back up and restore the ePO database using Enterprise Manager/ Management Studio.
  • SQL Enterprise Manager 
2. You must also backup the following folder paths (the default installation path is used - your installation might differ):
 
C:\Program Files\McAfee\ePolicy Orchestrator\SERVER\
All installed extensions and configuration information for the ePO Application Server service is found here.

NOTE:
 If you want to reduce the number of items to back up from the \SERVER folder backup, consider excluding onlythe following:
  • C:\Program Files\McAfee\ePolicy Orchestrator \server\logs (server log files)
  • C:\Program Files\McAfee\ePolicy Orchestrator\server\cache (Contains cached information that ePO creates and uses, such as generated chart images. ePO will regenerate that information, if deleted.)
  • C:\Program Files\McAfee\ePolicy Orchestrator\server\work (Contains cached information about web applications registered with Tomcat. Tomcat will regenerate that information, if deleted.)
C:\Program Files\McAfee\ePolicy Orchestrator\DB \SOFTWARE\All Products that have been checked into the Master Repository are located here.

C:\Program Files\McAfee\ePolicy Orchestrator\DB \KEYSTORE\
The Agent to Server Communication and Repository Keys that are unique to your installation are located here. Failing to restore this folder results in re-pushing the agent to all your systems, and checking in all of your deployable packages again.

C:\Program Files\McAfee\ePolicy Orchestrator\APACHE2\CONFThe Server configuration settings for Apache, the SSL Certificates needed to authorize the server to handle agent requests, and Console Certificates are located here. Failure to back up and restore this directory results in a re-installation of ePO to create new ones and possibly using a clean database installation.
 

Recovery
  1. Delete the ePO database on the SQL server.
    If you do not know how to perform the MSSQL operation, refer to http://technet.microsoft.com/en-us/library/ms177419.aspx or contact Microsoft Support.
     
  2. If restoring ePO to the same system, uninstall ePO. Ensure that there is no ePolicy Orchestrator folder in the original install path after the software is uninstalled.

    NOTE: Renaming the existing ePolicy Orchestrator folder and leaving the old directory in place may interfere with the new installation. McAfee recommends that you remove the old directory completely.
     
  3. Reinstall ePO to the same version and patch level as the server you are restoring.

    NOTE: You can verify the ePO patch level by looking at the Version field in the backed up Server.ini file (C:\Program Files\McAfee\ePolicy Orchestrator\DB\) and cross referencing it with article KB59938 - Version information for ePolicy Orchestrator.

    IMPORTANT: 
    You must reinstall ePO to the exact same directory path as the previous installation or initialization of extensions will fail when the restore is complete. Also, you do not have to specify the same port configuration except for the database. The ports are restored to the previous installation values during the restore.
     
  4. Apply any additional patches/hotfixes/POCs to ePO that had been previously applied.

    For ePO 4.x:- If you have previously installed Policy Auditor 5.x for use with ePO, install the same version of Policy Auditor (including the hotfix release) that had been installed before.
    - If you have previously installed McAfee NAC 3.x or McAfee NAC 4.0  for use with ePO, install the same version of McAfee NAC (including the hotfix release) that had been installed before.

    For ePO 5.x: - If you have previously installed Policy Auditor 6.2 for use with ePO, install the same version of Policy Auditor (including any hotfix releases) that had been installed before.

     
  5. After installing, stop and disable all ePO services:

    1. Click Start, Run, type services.msc, and click OK.
    2. Right-click each of the following services and select Stop:

      McAfee ePolicy Orchestrator Application Server
      McAfee ePolicy Orchestrator Event Parser
      McAfee ePolicy Orchestrator Server
       
    3. Double-click each of the following services and change Startup type to Disabled:

      McAfee ePolicy Orchestrator Application Server
      McAfee ePolicy Orchestrator Event Parser
      McAfee ePolicy Orchestrator Server
        
  6. Restore the database.

    NOTE: 
    Restore the database so that you do not require the ePO database configuration to be updated (for example: same name, host, port, and so on). Otherwise, you must update the restored DB.PROPERTIES file in C:\Program Files\McAfee\ePolicy Orchestrator \server\conf\Orion with the new information before starting up the server.
     
  7. Delete the following folders, then replace them with the corresponding folders that were backed up earlier:

    C:\Program Files\McAfee\ePolicy Orchestrator\SERVER\
    C:\Program Files\McAfee\ePolicy Orchestrator\APACHE2\CONF
    C:\Program Files\McAfee\ePolicy Orchestrator\DB \SOFTWARE\
    C:\Program Files\McAfee\ePolicy Orchestrator\DB \KEYSTORE\  
  8. Before you enable and start the ePO services, ensure that the contents (version numbers) of the C:\Program Files\McAfee\ePolicy Orchestrator\server\extensions\installed folder match the extensions listed in theOrionExtensions table.

    To check the contents of the OrionExtensions table, access the SQL Tools and run the following T-SQL command:

    Select * from OrionExtensions

    If there is a mismatch on server startup, the server removes each extension not listed in the OrionExtensions table. If this happens, check in these extensions again and also restore the database again.
     
  9. Start the McAfee ePolicy Orchestrator Application Server service.

    NOTE: 
    You must start this service for RunDllGenCerts to work.
     
  10. Rename the SSL.CRT folder (see path below) to SSL.CRT.OLD and manually create an empty folder named SSL.CRT in the same path, otherwise the setup will fail to create a new Cert:

    32-bit: "C:\Program Files\McAfee\ePolicy Orchestrator\APACHE2\CONF\SSL.CRT"
    64-bit: "C:\Program Files (x86)\McAfee\ePolicy Orchestrator\APACHE2\CONF\SSL.CRT"

     
  11. Click Start, Run, type cmd, and click OK.
  12. Change directories to your ePO installation directory.

    Default path:

    32-bit: Program Files\McAfee\ePolicy Orchestrator\
    64-bit: Program Files (x86)\McAfee\ePolicy Orchestrator\
     
  13. Run the following command:

    IMPORTANT: - This command will fail if you have enabled User Account Control (UAC) on this server. If this is a Windows Server 2008 or later, disable this feature. You can find more information about UAC at: http://technet.microsoft.com/en-us/library/cc709691(WS.10).aspx.
    - This command is case-sensitive. The ahsetup.log (found in ) provides information about whether the command succeeded or failed and will state if it used the files located in the ssl.crt folder

    Rundll32.exe ahsetup.dll RunDllGenCerts  <"installdir\Apache2\conf\ssl.crt">

    where:

     is your ePO server's NetBIOS Name
     is your ePO Console Port (default is 8443)
     is admin (use the default ePO admin account)
     is the password to the ePO Admin console account
     is your installation path to the Apache folder; Default installation path:

        32-bit: "C:\Program Files\McAfee\ePolicy Orchestrator\APACHE2\CONF\SSL.CRT"
        64-bit: "C:\Program Files (x86)\McAfee\ePolicy Orchestrator\APACHE2\CONF\SSL.CRT"

    Example:Rundll32.exe ahsetup.dll RunDllGenCerts eposervername 8443 administrator password "C:\Program Files\McAfee\ePolicy Orchestrator\APACHE2\CONF\SSL.CRT"
     
  14. Start the following services:

    McAfee ePolicy Orchestrator Event Parser
    McAfee ePolicy Orchestrator Server

     
  15. Look in the DB/logs/server.log to ensure that the Agent Handler (Apache server) started correctly.  It should state something similar to the following:

    20090923173647        I           #4108  NAIMSRV      ePolicy Orchestrator server started.
    If it does not, there will be an error similar to:

    20090923173319       E          #4736  NAIMSRV      Failed to get server key information.


Wednesday, April 24, 2013

Deleting Events in MacAfee Host Data Loss Prevention (HDLP)

How to Delete Events in MacAfee Host Data Loss Prevention (HDLP)

1. GO TO DLP POLICY MANAGER


To verify that the events have been deleted, i am running the client task manually created to check the violations of Email Protection Rule.


There were many events coming up, after flushing the macafee DLP events as shown above, the entries were flushed.


Wednesday, April 10, 2013

How to uninstall Host Data Loss Prevention agent without using a challenge code

The solution has been taken from Mcaffee site:

 https://kc.mcafee.com/corporate/index?page=content&id=KB69151&cat=CORP_DATA_LOSS_PREVENTION_HOST&actp=LIST


Problem

Unable to uninstall Host Data Loss Prevention (Host DLP) when the Management Console has been deleted or is unavailable to provide a challenge code.

Solution

As designed, you cannot remove the Host DLP agent without the challenge key provided from the console unless the administrator has disabled the uninstall challenge-response mechanism in the policy. This is provided so that unauthorized users cannot remove the Host DLP agent unless the administrator explicitly configures the policy to allow it.

To configure the policy to allow unchallenged uninstalls:
  1. Log on to the ePO 4.x console.
  2. Click Menu, Data Protection, DLP Policy.
  3. Set the Show Challenge-Response on uninstall option to Disable under the Advanced Configuration tab in the policy.

Workaround

Uninstall the agent through an ePO task on the affected computers:
  1. Log on to the ePO 4.5 console.
  2. Click System Tree.
  3. Create a new subgroup:
    1. Click System Tree Actions, New Subgroup.
    2. Type a name for the group, and click OK.
    3. Select the affected computers.
    4. Click Actions, Directory Management, Move Systems.
  4. Select the newly created group and click OK.
  5. Create a new client task:
    1. Click the Client Tasks tab.
    2. Click New Task under Actions.
    3. In the Name field, type a name for the task. (for example, Remove DLP Agent.)
    4. In the Type field, select Product Deployment, and click Next.
    5. In the Products and Components field, select Data Loss Prevention 9.0.0.
    6. In the Action field, select Uninstall, and click Next.
    7. Click Next.
  6. Change the Schedule Type to Run immediately, and click Next.

    NOTE: The task is scheduled for the next time the McAfee Agent updates the policy. To force the installation to take place immediately, send an agent wake-up call.
     
  7. After the task has completed, restart the affected computers.

How to auto Sync Active Directory with Mcafee ePO 4.6

How to auto Sync Active Directory with Mcafee ePO 4.6

In order to  auto Sync Active Directory with Mcafee ePO 4.6 so that as soon as the new systems are added in the AD, they are replicated in the Mcafee ePO so the policies can be applied accordingly. We need to create a server task, please follow screenshots


How to auto Deploy Mcafee ePO 4.6 agents on Windows machines

How to auto Deploy Mcafee ePO 4.6 agents on Windows machines

In order to auto Deploy Mcafee ePO 4.6 agents on Windows machines we need to develop a Server task. Please follow the screenshots to have a view.


Tuesday, April 9, 2013

How To Setup McAfee Agent Handler

How To Setup McAfee Agent Handler

Please see the following SNAP SHOT. Agent Handler can only be installed on Windows Server 2003 SP 2 and Windows Server 2008 in Windows environment.


Agent Handler SETUP can be found in McAfee ePO setup.


Setup will ask for details of your ePO sever and its administrator password.


After Installation is completed, Agent Handler will be visible in your ePO Server's System Tree Automatically.


Make a new Sub Group in System and Name it According to your need (e.g. Department name, Location etc.). this group will contain the systems that will communicate directly with the Agent Handler.


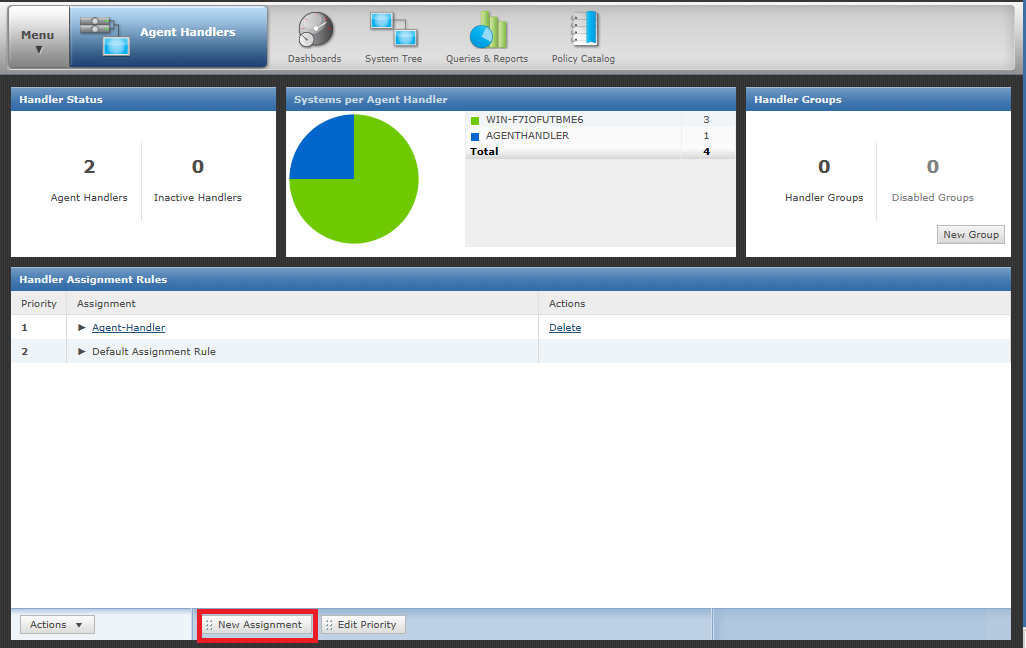
To see Agent Handler configuration , assignments and priorities please follow following SNAPSHOT.
Go to Menu, then Configuration and Click Agent Handlers.


On Agent Handler page click new assignment to create new assignment rule so that systems that are needed to communicate with Agent Handlers can be reached. Also this helps the Agent Handler to service the mentioned sub-nets or clients.


when you click new assignment tab following window will appear where you can give the details and configure your assignment rule and customize your Handler Priority.


Click on Policy Catalog to create the policy that allows desired agents to communicate with Agent Handler but not with ePO server. to Create policy Duplicate the existing MY Default policy of McAfee Agent's policies and name it as you want.


Click to edit Policy.


Add desired system to the Specific group on which agent handler policy needs to be applied.


do the following steps to change policy assignment. assign the policy which was created so that desired systems can communicate to agent handler to the group.


Agent Handler installation and configuration is completed. Now we have to verify that only desired systems are communicating with the agent handler. to do this we can perform following steps on host with agent.

                             
from upper SNAPSHOTS we can verify that the desired agents are communicating with the Agent Handler. to check the communication of other agents with ePO server we can perform following steps. do not get confused with the properties of McAfee agent. Run the update process to verify communication.


Important Ports that are needed for the Agent handler outbound and bi-directional communication.
Agents Handler Ports have been taken from official McAfee KnowledgeBaseMcAfee 

AgentHandler Official white paper can be viewed as a reference.

Wednesday, April 3, 2013

How to setup McAfee DLP email protection


McAfee DLP email protection

How to configure Mcafee DLP email protection

To configure McAfee DLP email protection you must first configure your tags

AFTER YOU’VE CONFIGURED TAGS, YOU CAN CONFIGURE EMAIL PROTECTION. HOW DO YOU DO THAT? LOOK BELOW TO  STEP BY STEP MCAFEE DLP EMAIL PROTECTION CONFIGURATION

Step 1 to configure Mcafee DLP email protection
Logon to your EPO and go to DLP Policy, click Add New from the Menu and click email protection rule, like in fig-1
Mcafee DLP email protection fig-1 mcafee dlp email protection


Step 2  to configure Mcafee DLP email protection
Right click on email protection rule that you created and in Email Destination field type the name of the rule.. In my case “out of company”. Select the email destination field, uncheck the box  from “your company” and check box from “Other email domain”
Mcafee DLP email protection  fig-2   mcafee dlp email protection


Step -3 to email protection
After this, click next until image displayed is like in fig 3. Here you must assign tag (ex. suppose we have Internal Use documents.) After creating a tag Internal Use, we must assign this tag  to our rule, like in fig.3
Mcafee DLP email protection
fig-3 email protection


Step 4 – to email protection
In fig-4 you must assign a reaction. Reactions can be: block, monitor notify user, request justification and store evidence. It depends to your wishes to assign what reaction you want. You can combine reactions .
Mcafee DLP email protection
fig-4 – email protection


Step 5 – to email protection
After that, you must assign this rule to a “group members” or to a “specific user”.
Mcafee DLP email protection
fig -5  - email protection


In this way you configure McAfee DLP email protection.

Mcafee HDLP (HOST DATA LOSS PREVENTION) Reporting for USB activity


Here are instructions for EPO 4.5 (may differ slightly for EPO 4.0):


  1. Logon to ePO console
  2. Navigate to Menu | Reporting | Queries
  3. Click New Query
  4. Select Others for Feature Group and DLP Events for Result Types | Next
  5. Select Table | Next
  6. Remove all of the selected columns and add the following*:
    • Computer Name
    • User Name
    • Destination
    • Evidence Type
    • Evidence value
  7. Click Next
  8. Add the filter Event Type | Equals | DLP: Removable Storage Protection
  9. Click Run and confirm you have the results you are looking for. If so click Save | Give the report a name and select a group to store it in | Click Save.

* You may want different columns these are just the ones that made sense to me given what you wish to query. The actual file name will be stored in the Evidence value column.

Wednesday, March 6, 2013

SOLVED: Mcafee Antivirus VSE 8.8 not getting installed when deployed from ePO 4.6

Mcafee Antivirus VSE 8.8 not getting installed when deployed from ePO 4.6

When deploying the Mcafee Antivirus VSE 8.8 from ePO 4.6, we were getting the error message that VSE is failing to install on the remote machine.

Solution:

Our remote desktop user has set to automatically share a local system folder with the remote machine. This create a virtual UNC connection. Removing the shared folder/drive and deploying again the VSE succeeded

You can verify this also, when you go to C:\Program Files\Mcafee\VirusScan Enterprise

if this folder is created and ePO is still showing progress means that VSE is being installed.

You are Done Here :)

NOTE: PLEASE TRY TO REMOVE ANY SHARES, IRRESPECTIVE OF THE PATCH INSTALLED. WE HAD ePO 4.6 with Patch 2 installed but still were experiencing the issue above, so removing shares,installed the issue :)

Friday, February 8, 2013

MCAFEE HOST DLP WORKFLOW


MCAFEE HOST DLP WORKFLOW


McAfee host DLP step by step installation and configuration in ePO

This post assumes that you have already installed and setup McAfee ePolicy Orchestrator on a standalone or cluster mode.

Step 1: 
Disable internet explorer enhanced security configurations as shown in below screen shot.


Step 2:

Install McAfee DLP WCF service on the ePO (database) server (extract DLP setup to find WCF service installer). In case you have a cluster install this service on both roles.


Even in case you have installed ePO in cluster mode, don’t install DLP WCF service in the shared drive.


If you have installed SQL server in cluster mode, mention SQL cluster network name in the Database server field as shown in below screenshot.


Step 3:

Create two shared folders for evidence and whitelist respectively. If you have ePO in cluster mode, create these folders in the shared data drive where ePO server installation files are installed. Repeat next step for each folder. 


 For evidence folder, also add Administrators(local) group as shown in the below screen shot.


Step 4:
Now add the DLP extension in ePO server. (do this step by accessing ePO console on the server itself).  Click on Install extension and browse the extension file. Click OK  and the DLP extension will be installed.


Once the extension is installed, the next step is to open ePO console and open the DLP policy and DLP monitor. This will require some configurations for the DLP management consoles. This is required to be installed on the management workstation and/or ePO server wherever from you access the ePO console.
After finishing this step, the next and final step is to check-in the DLP agent in master repository so that it can be pushed on the client workstations.

Step 5:
After installation initial license is given for 90 days and with this license not all features are enabled so you have to update your license as shown below.


Enter your full license key, log off from ePO server and login again.  To enable full product features go to agent configurations -> edit global agent configuration.


Now go to File Tracking and enable the option Device control and full content protection.


Share

Twitter Delicious Facebook Digg Stumbleupon Favorites More