Tuesday, February 12, 2013

Host DLP Implementation Plan

Irrespective of the vendor product you select for your host DLP, following steps can be used to successfully implement DLP in your organization. 

Define focus area
First and the most important step is to define your focus area. Depending on the size of the organization, DLP implementations could take up to six months to one year easily. You can't start deploying DLP in the whole organization at once. The approach should be to start with limited scope and then gradually expand to the whole organization. 
Examples of focus are monitoring and protecting email communication between company's executives and board members or it could also be a certain department such as HR or Finance. After selecting your focus area held meetings with the team members of your focus area and gather information such as what types of important information (from their point of view) they hold and where it resides. Also what keywords are generally used in their documents. Keywords are important as they will be used in the later stage to TAG the documents. 

Perform risk assessment 
Risk assessment at this point will provide deeper understanding of the risks, costs, and potential sources of data loss. The more you know about the sources of data loss more accurately you would be able to translate this information into rules.

Classify your data
If you haven't already defined data classifications for your organization, following classification scheme can be used as it is or with some modifications according to your environment.
  • Protected: Information is not shared with anyone.
  • Restricted: Information is shared only with selected members of the organization.
  • Confidential: Information is shared between selected departments or partners.
  • Internal: Information can be shared within the whole organzation and to partners.
  • Public: Information can be shared with anyone.
Identify information flows
Once you have defined a classification scheme for your organization, the next step is to identify information flows. You need to know the source and destination of the information you want to protect when it is shared within the organization or to external partners or customers. At this point basically you are identifying the normal flow of the information. For example the payroll information should only be shared among selected members of the payroll department. This information should not be shared with any one else in the organization or outside it. Another example could be that financial audit reports should only be shared between members of the finance department and audit department or external auditor.

Tag/Label documents
After identifying the information flows, all documents should be labeled according to the classification scheme. This is the core on which your DLP rules work. There are two methods you can adopt in your organization as a combination or standalone. First one is to manually add tags in your documents. For example you can write protected, confidential, or internal keywords in the document headers or for Microsoft documents you can add the tag value in document properties. This approach is very accurate however the difficult part is that you have to enforce this practice in your organization, educate your users, and make sure every one follows this practice by conducting audits.
The second approach is based on keywords. In step one of the implementation plan, I mentioned that after defining your focus area you should held meetings with the team members and collect different keywords normally used in their. You can then use these keywords to the discover documents on the user machine and tag them accordingly. Normally all host DLP's have a discovery feature that you can use to discover and tag documents.

Define Policies
Clearly write all set of protection policies. This might be a legal or compliance requirement but more importantly clearly written policies will help your IT team to translate them into DLP rules easily and effectively.

Implement policies in DLP
In this step translate all protection policies into DLP rules. At first your rules should not block any communication rather they should be configured only to monitor the events. Based on these events you can fine tune your rules and then once you are sure that it will not interrupt the normal information flows you  can set your rules to block any activity that should not be allowed.


Sunday, February 10, 2013

How to integrate Firemon with Active Directory to authenticate users

How to integrate Firemon with Active Directory to authenticate users

Steps that need to be followed on the Microsoft Certificate Authority


Converting the .CER certificate to .DER certificate

Log on to https://www.sslshopper.com/ssl-converter.html to convert the .CER certificate to .DER as firemon uses only .DER certificate


Click on convert and .DER certificate will be downloaded. The certificate is ready to be uploaded on the firemon server and to be installed.


Upload the Certificate on the firemon server and installing it

Login to the firemon server using the ssh shell,  you can use PUTTY.

Go to /opt/firemon/JAS

In order to upload the certificate to the above mentioned path, you can use WINSCP to upload the certificate


we need to first stop the firemon server using the command below

logon to putty and go to the JAS folder and run fmsh_fmstop command to stop the server


use the command to install the certificate 

./fm-server.sh -installCert -alias ad-certificate -filename ad-certificate.der


we need to start the service after installing it.


Settings that need to be made on the Firemon using the Client GUI


NOTE:
You need to create any account in the Managed Services Account in AD, the account doesnt need any special privileges, it only is required to query the AD for the user searching and authentication


once all the settings are done, we will login from the ad user on the firemon and Viola.........we are IN!


Friday, February 8, 2013

MCAFEE HOST DLP WORKFLOW


MCAFEE HOST DLP WORKFLOW


McAfee host DLP step by step installation and configuration in ePO

This post assumes that you have already installed and setup McAfee ePolicy Orchestrator on a standalone or cluster mode.

Step 1: 
Disable internet explorer enhanced security configurations as shown in below screen shot.


Step 2:

Install McAfee DLP WCF service on the ePO (database) server (extract DLP setup to find WCF service installer). In case you have a cluster install this service on both roles.


Even in case you have installed ePO in cluster mode, don’t install DLP WCF service in the shared drive.


If you have installed SQL server in cluster mode, mention SQL cluster network name in the Database server field as shown in below screenshot.


Step 3:

Create two shared folders for evidence and whitelist respectively. If you have ePO in cluster mode, create these folders in the shared data drive where ePO server installation files are installed. Repeat next step for each folder. 


 For evidence folder, also add Administrators(local) group as shown in the below screen shot.


Step 4:
Now add the DLP extension in ePO server. (do this step by accessing ePO console on the server itself).  Click on Install extension and browse the extension file. Click OK  and the DLP extension will be installed.


Once the extension is installed, the next step is to open ePO console and open the DLP policy and DLP monitor. This will require some configurations for the DLP management consoles. This is required to be installed on the management workstation and/or ePO server wherever from you access the ePO console.
After finishing this step, the next and final step is to check-in the DLP agent in master repository so that it can be pushed on the client workstations.

Step 5:
After installation initial license is given for 90 days and with this license not all features are enabled so you have to update your license as shown below.


Enter your full license key, log off from ePO server and login again.  To enable full product features go to agent configurations -> edit global agent configuration.


Now go to File Tracking and enable the option Device control and full content protection.


Mcafee Nitro SIEM "Out of hours activity" rule customization in ADM

Monitoring out of office hours activity is important to identify malicious activities in your network. However it is important to not leave this ADM rule on its default settings but optimize it according to your environment. With default settings, the rule might trigger hundreds of thousands of events that shouldn't actually be triggering under this category. Moreover there are many correlation rules that will trigger based on out of hours activity rule events. Not optimizing this rule properly will also result in many false positives of different correlation rules events.

Optimization Steps
The first step is to make sure the time settings is correct. All time values should be set to GMT 0 time zone. Even setting up the correct time values will significantly reduce number of events in out of hours activity rule.

Once correct time settings are applied, the next step is to identify top source IP addresses generating these events. By analyzing events from these IP addresses you should be able to identify and separate events that should be triggering from those that shouldn't. For example you might have network monitoring servers in your environment that send probes to all network devices on port 161 and these probes are sent 24 hours a day. This activity can cause huge number of events in the out of hours activity rule. So you know that network monitoring servers sending probes on port 161 is not a malicious traffic and it should be excluded from these events. Similarly you can analyze events of all top IP sources and identify if the activity is legitimate or not based upon which you can exclude that specific traffic from out of hours activity rule.

Now comes the most important point in optimizing the rule. Below screen shot shows that IP address 10.255.222.16 is sending SNMP packets to different network devices on port 161.

By looking at the events it seems obvious to add following statement in the out of hours activity rule to exclude this IP address:

any "object source ip" NEQ [10.255.222.16]
AND
any "object destination port" NEQ [161]

However above condition will never work. If you open the session details of this event you will notice a difference which is the IP addresses and ports are reversed in the session detail. So in above case, the source IP will be written as the destination IP and destination port will become source port. So now the correct statement to include in the rule will be following:

any "object destination ip" NEQ [10.255.222.16]
AND
any "object source port" NEQ [161]


Mcafee Host DLP client end troubleshooting

Mcafee Host DLP client end troubleshooting

In order to check if the policies applied in the ePO DLP are applied at the client end or not, there is a utility provided by the Mcafee.

Click here to download Mcafee Nitro DLP Diagnostic utility

There are 32bit and 64 bit versions of this diagnostic tool. Use the one that best suits your requirements.

When you double click to run the Diagnostic utility, you will be asked to enter a VALIDATION CODE.


You will have to generate the Validation Code on the basis of Identification code that the utility will provide.

In order to generate the respective Validation Code, you need to login to your ePO server.


Proceed to the menu and click Data Protection and click DLP Policy


Now Go to TOOLS and click AGENT OVERRIDE KEY


once you click on the Generate Agent override key, you will be asked to enter the following details


Depending on how long you want to have the session, from one minute to 30 days you can set up the session and click GENERATE, it will generate a new Validation Code, you can provide it to the end user and it will unlock the Mcafee DLP Diagnostic utility


If you wish to find how to test if Mcafee Host DLP policies are applied to the end machines, following our post

Hope this helps :)

How to test if Mcafee Host DLP policies are applied to the end machines


How to test if Mcafee Host DLP policies are applied to the end machines

In order to check the status of the policies that have been applied to the end machine , you can navigate to the active policy tab


this way you will be able to verify which policies have been applied to the end machine or not. We can see which Tagging rules, Classification rules, Protection and Discovery rules have been applied. We can also check the Relevant Policy Definitions that have been applied to the end user.

If you wish to test Classification and tagging applied to the end machine or user, following our post How to test Classification and Tagging and Test Evidence

Hope this helps :)

How to test Classification and Tagging and Test Evidence

How to test Classification and Tagging and Test Evidence

We can also try to verify if our Classification and Tagging policy has been applied properly or not. For this we make use of the DLP Diagnostic tool , we can download and set it up by following this post already shared.


Go to the TOOLS tab in the Mcafee DLP Diagnostic tool.


SCENARIO TO TEST

Suppose we have the following scenario. We want to tag our documents with the following keywords "finance", "tender", "contract". We want to ensure that if any documents that contain these keywords are used or sent the user activity is monitored by DLP and we can set to block, or monitor or store evidence or ask user for the justification. In order to achieve this mentioned scenario, below are the steps that we will perform. These steps will show us how to set up the necessary tagging rules and classification policy based on the Dictionary that has these keywords("finance", "tender", "contract").

We will then apply the policy to the user and verify at the client machine using the Mcafee DLP Diagnostic tool that the files have been successfully tagged according to the rules we have set.


Lets suppose that we have a classification and tagging rule applied which is setup based on the following classification rule.

Setting up Classification Rule

Click Classification Rule and press to add a New Content Classification Rule


click add to add new content category, or if you have already created one , it will show here, just select it


Now , we will tell how to create a custom Dictionary like we have used in the screenshot above.

Setting up Custom Dictionary with the keywords


This way we have created a Dictionary, which has the keywords "finance", "tender", "contract".

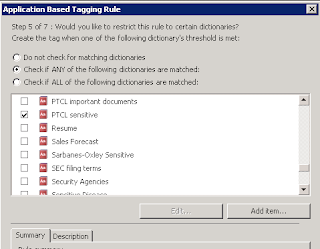
Setting up Tagging Rule

We will select Application based tagging rule as we want all the office documents like MS WORD, MS EXCEL etc that contain the custom keywords to trigger the Protection rules in DLP.


We have selection application definition, Email Client and Microsoft Office Applications, this means that all these applications that will when access any document or anything with the keywords "finance", "tender", "contract" will be tagged.


we will show what we have selected in for example MS Office Applications, you need to check the MS office Applications and click Edit.


Click Original Executable File Name and check all the office applications or any of those that you wish to monitor


Here we are done with the Tagging rule :))

Now we need the DLP to crawl the end user machine, crawl all the files that have these keywords and tag them with respect to our rules. How to set DLP to perform client machine discovery, below are the steps.


Setting up Mcafee Host DLP Client discovery

Go to the Mcafee ePO and click Data Protection, DLP Policy, once you are on the main screen, click on the Agent Configuration and select Edit Global Agent Configuration


Click Discovery Settings Tab and click File System Discovery as shown in the image below


Wake up the agent in order to apply the policies (I am not sure if this is mandatory step at this point, as crawling should automatically start as its configured to run at the specified time)

To check if the Discovery has started on the client machine or not. Go to the System Tree and click on the selected PC/System where you want to check if the discovery has started or not.


click on products tab as shown and click Data Loss Prevention as highlighted


Scroll down till you can see the crawling information

when your discovery will be running , you will see status running instead of stopped , mine is showing that discovery has been done and 96104 files have been crawled


now we are done, we will apply the Mcafee Host DLP Protection Rule

Setting up Mcafee Host DLP Protection Rule

We will create a new Application Protection Rule


NOW COMING BACK TO THE MAIN TITLE OF THIS POST, HOW TO TEST, WE WILL USE THE MCAFEE DLP DIAGNOSTIC TOOL.

we created a test file called Contact.txt and entered the keywords "finance", "tender", "contract" etc. Since we have applied the Application Protection rule, as soon as i double click to open the file, Mcafee Host DLP showed the notification message that the file is being monitored. Now we want to test it through the DLP Diagnostic tool.


We open the Mcaffee DLP Diagnostic tool and click on the Tools Tab

Under Test Classification and Tagging, we will click browse to upload the file and test if the tagging is performed or not.


Hope this detailed and step by step tutorial helped many of how to setup Mcafee Host DLP Content Classification rule, Tagging Rule, Dictonary , File System Discovery/verification and Protection Rule.

Thanks :)


Share

Twitter Delicious Facebook Digg Stumbleupon Favorites More